Welding is a crucial process in various industries, and weld symbols play a vital role in ensuring the quality and accuracy of the welds. These symbols are graphic representations that convey important information about the weld joint and the welding process. Understanding how to read and interpret these symbols is essential for welders, engineers, and anyone involved in the fabrication and inspection of welded structures.
Basic Structure of a Welding Symbol
To begin with, weld symbols consist of a variety of lines, arrows, and other geometric shapes that communicate specific details about the weld joint. These symbols are used to indicate the size and type of weld, the welding process to be employed, and the necessary specifications or special instructions. By examining a weld symbol, one can easily determine the desired weld size, the type of weld joint, and the essential details required to carry out the welding task correctly.
Welding Symbols
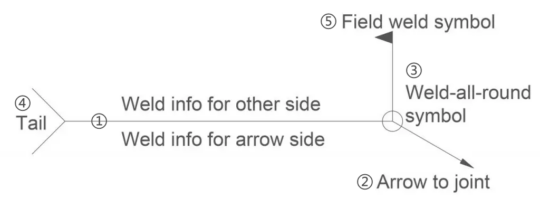
A welding symbol consists of several key components that provide specific instructions for the weld. Below is a breakdown of each part:
- ①Horizontal Line (Reference Line): This is the foundation of the welding symbol. It holds the weld details and connects to the joint through an arrow.
- ②Arrow: Points to the location of the weld on the joint. The instructions on the reference line apply to the indicated area.
- ③Weld-All-Around Symbol: Represented by an open circle at the junction of the arrow and reference line, this indicates that the weld should go entirely around the joint.
- ④Tail: If present, it contains supplementary information such as welding processes, electrode types, or additional requirements. If not needed, the tail may be omitted.
- ⑤Field Weld Symbol: A flag at the arrow/reference line junction signifies that the weld should be completed on-site rather than in a shop.
Fillet Weld Symbol
Let’s take a closer look at some frequently used weld symbols and how to decipher them. One common symbol is the fillet weld symbol, which typically consists of a “triangle” placed on the reference line. The size of the triangle represents the dimensions of the fillet weld, while the sides of the triangle indicate the positions where the welds are to be made. By carefully examining this symbol, welders can easily identify the size and location of the required fillet welds.
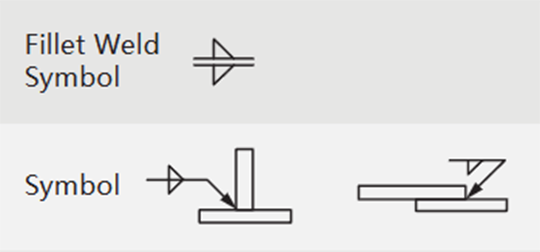
Fillet Welding Symbols
Groove Weld Symbol
Another important symbol is the groove weld symbol, which resembles a continuous line with additional lines or symbols indicating the specifics of the weld joint. The basic groove weld symbol indicates a square groove with no particular specifications. However, additional symbols like an arrow, tail, or other indicators can be added to convey the desired groove weld shape, preparation requirements, or any necessary details. By analyzing these symbols, welders can accurately understand the type of groove weld required and its associated dimensions.
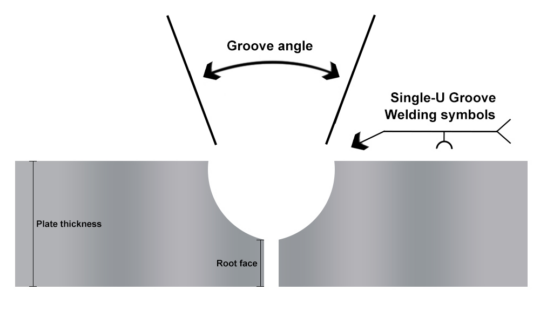
Single-U Groove Welding Symbols
Other Welding Symbols
In addition to fillet and groove weld symbols, there are other crucial symbols that provide essential information about the welding process itself. For instance, the welding process symbol indicates the type of welding process to be used, such as shielded metal arc welding (SMAW), gas metal arc welding (GMAW), or submerged arc welding (SAW). This symbol helps welders choose the appropriate welding technique and equipment for the specific task at hand, ensuring precise and efficient results.
One should also pay attention to symbols that represent specific weld details or instructions. These symbols convey vital information such as weld finishing requirements, the need for preheating or post-weld heat treatment, or any special processes to be followed. By carefully examining these symbols, welders can ensure that all necessary steps and precautions are taken, thus avoiding potential defects or failures in the welded structure.
The Advantages of Learning Weld Symbols
Now, let’s delve into the benefits and application areas that customers consider while purchasing a book or course on how to read weld symbols. Clearly understanding and interpreting these symbols can greatly enhance one’s welding skills, ensuring precise and accurate welds. This knowledge opens up numerous opportunities in the welding industry, allowing individuals to take on more complex projects and advance their careers.
Moreover, customers seeking to learn how to read weld symbols find these resources invaluable when it comes to passing industry certification exams(CWI). Many welding certifications require candidates to demonstrate their proficiency in interpreting weld symbols. Therefore, investing in a book or course that provides comprehensive explanations, clear examples, and practice exercises can significantly increase the chances of passing these exams with flying colors.
Furthermore, the ability to read and interpret weld symbols is not limited to welders alone. Engineers, designers, and inspectors also benefit greatly from understanding these symbols. By comprehending the weld symbols, engineers can communicate their design intent accurately to the welding team, ensuring that the final product meets the desired specifications. Inspectors, on the other hand, can use their knowledge of weld symbols to verify that the welds adhere to the required quality standards.
Let’s Have a Test!
Now that you’ve learned about weld symbols, let’s test your understanding. Look at the weld symbol below and try to interpret its meaning.
Question:
What does this weld symbol indicate?
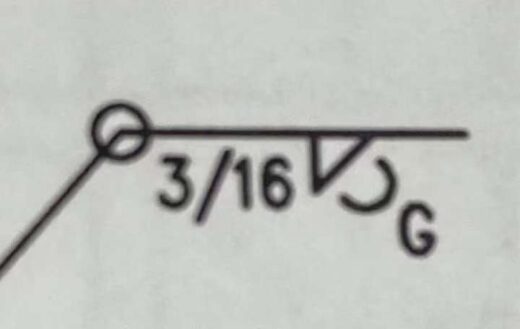
Take a moment to analyze the symbol. Think about the weld type, size, location, and any additional requirements.
Now, Reveal the Answer!
This weld symbol provides the following instructions:
- Fillet weld: The triangular symbol represents a fillet weld.
- Weld size – 3/16” The number specifies the weld’s size in inches.
- All-around weld: The circle at the intersection of the reference line and arrow indicates that the weld must be applied all around the joint.
- Convex weld profile: The curved symbol represents a convex finish.
- Grinding required: The letter “G” denotes that the weld should be finished by grinding.
Final Interpretation:
This symbol instructs the welder to create a 3/16-inch fillet weld all around the joint with a convex profile, and the weld must be ground for finishing.
Conclusion
In conclusion, weld symbols are graphic representations that convey important information about weld joints, welding processes, and specific weld details. Understanding how to read and interpret these symbols is essential for welders, engineers, and inspectors in ensuring the quality and accuracy of welds. By mastering the art of reading weld symbols, individuals can improve their welding skills, increase career opportunities, and contribute to the successful fabrication of welded structures.
So, whether you are starting your journey in the welding industry or aiming to enhance your existing skills, investing in a comprehensive resource on how to read weld symbols is a wise decision. By gaining proficiency in understanding these symbols, you equip yourself with a valuable tool that will surely benefit your professional growth and broaden your horizons within the welding field. Embrace the opportunity to unlock the secrets of weld symbols, and watch your welding expertise soar to new heights.